
How to Grow Microgreens Indoors in Canada
A tray, a bag of mix, a packet of seed and a bright spot. Microgreens go from seed to scissors in one to two weeks, which makes them the quickest indoor crop for a Canadian winter.
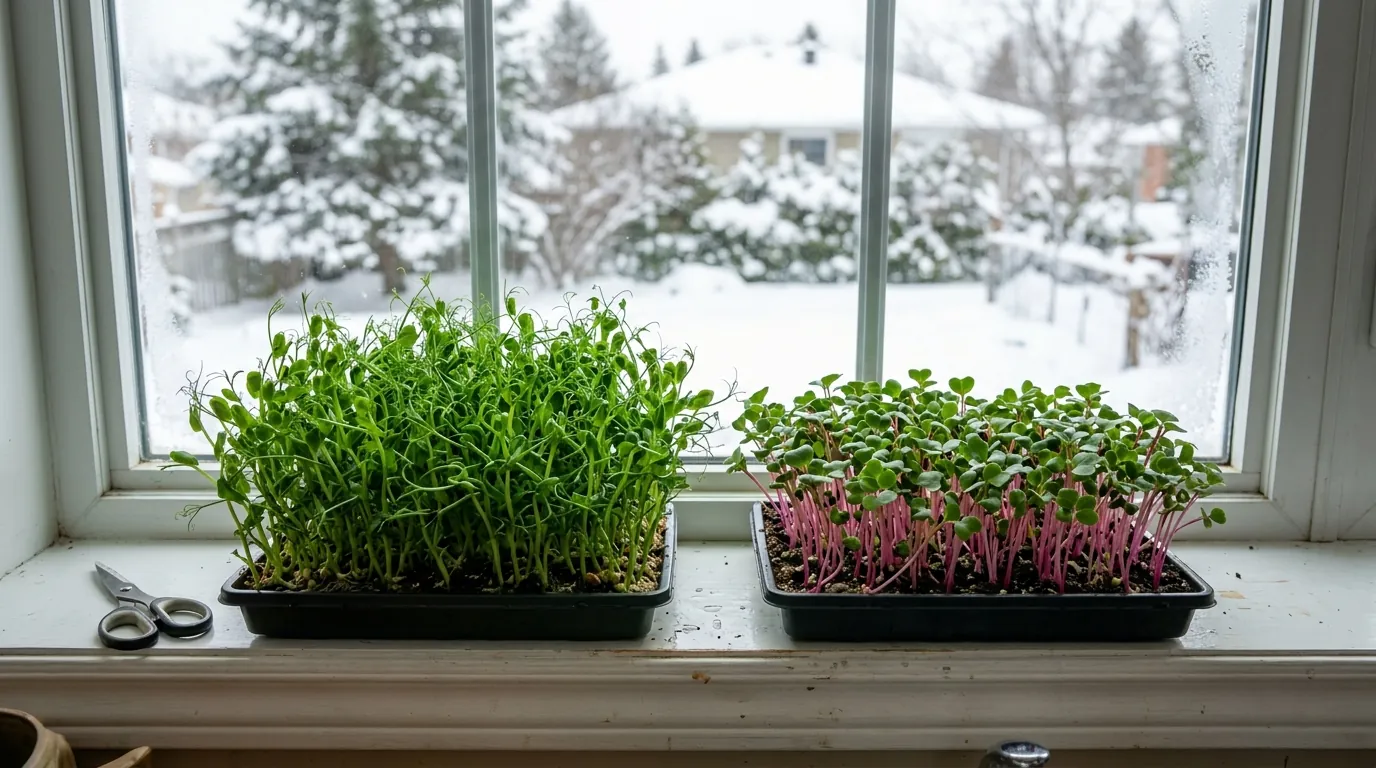
Microgreens are seedlings of ordinary vegetables, herbs and grains, cut when they have their first leaves. The University of Saskatchewan describes them as young plants that have been growing for two to three weeks and are harvested as soon as the seed leaves and the first true leaves have emerged. Radish, broccoli and pea are the easiest place to start, and everything you need to grow microgreens at home fits on a windowsill or a single shelf.
They are not the same as sprouts. Sprouts are grown in water in a jar and eaten whole; microgreens grow in a tray of mix, in light, and are cut above the roots. The difference matters for food safety, and it is covered below.
Microgreens, in short: a shallow tray with drainage holes, 2–3 cm of moist seed-starting mix or coir, seed scattered thickly in one layer, covered and dark for 2–4 days, then a south window or a grow light. Water from below. Cut with scissors when the first true leaves appear: about 8–12 days for radish and broccoli, 8–10 for pea shoots.
What You Need
- A shallow tray with drainage holes, 3 to 4 cm deep. A standard 25 × 50 cm seed-starting flat (sold as a “1020 tray”) is what most growers use; a clean clamshell or pie plate with holes poked in it works for a small batch.
- A second tray without holes underneath, to water from below and protect the counter.
- Growing medium. Seed-starting mix, coconut coir or a grow mat. The University of Saskatchewan recommends a soilless mix of peat, perlite and vermiculite rather than garden soil, which brings in mould.
- Seed sold for sprouting or microgreens, untreated. Never use garden seed coated with fungicide (usually dyed pink, blue or green).
- A cover: an upside-down tray, a clear dome or plastic wrap.
- Light: a sunny south window, or a grow light on a timer (see below).
Commonly used for microgreens: a shallow 1020 flat with drainage holes nested inside a second flat without holes. You water into the bottom tray and the mix wicks it up, which keeps the leaves dry and the mould down. Thicker trays outlast the thin, flexible ones and can be washed and reused for years.
Affiliate link — GrowersGuide.ca may earn a commission on qualifying purchases, at no extra cost to you. See our affiliate disclosure.
How to Grow Microgreens, Step by Step
- Moisten the mix until it feels like a wrung-out sponge, and fill the tray 2 to 3 cm deep. Level it and firm it gently.
- Soak large seed. Peas and sunflowers go in water for about 6 to 12 hours first. Small seed such as radish and broccoli needs no soak, according to Utah State University Extension.
- Sow thickly, in one layer. Scatter the seed evenly so it covers the surface without piling up. Utah State uses about 28 g of broccoli, 42 g of radish or 150 g of soaked peas for one 25 × 50 cm tray. Press the seed into the mix with your hand or a flat board.
- Cover and keep dark for 2 to 4 days at room temperature. The University of Saskatchewan suggests a warm room, 20 to 25 °C. Many growers put a second tray directly on the seed with a light weight on top, which presses the roots into the mix and makes the stems come up evenly.
- Uncover once the seedlings are up and give them light straight away. Pale yellow seedlings turn green within a day.
- Water from below. Pour water into the solid tray underneath, let the mix soak it up for 15 to 30 minutes, and tip out what is left. Watering over the top flattens the seedlings and keeps the leaves wet.
- Keep air moving. A small fan on low, a few hours a day, cuts the damp, still air that mould needs.
Soil for Microgreens, or No Soil at All
Microgreens do not need much from what they grow in: something that holds water, lets roots anchor, and stays clean. Penn State Extension lists three common choices: peat-based mixes, coconut coir, and grow mats made of natural fibres (cotton, kenaf, hemp) or rockwool.
| Medium | Good for | Watch for |
|---|---|---|
| Seed-starting mix (peat or coir with perlite or vermiculite) | Every crop, especially pea and sunflower, whose roots like depth. Holds water well, so it forgives a missed day. | Specks of mix on the harvest; cut a little higher. |
| Coconut coir | The medium Utah State University Extension uses: moisten it until it feels like a wrung-out sponge, 2 to 3 cm deep. | Sold as a dry brick; it needs soaking and fluffing before use. |
| Grow mat (hemp, cotton, kenaf or rockwool) | Small-seeded crops such as radish, broccoli, kale and arugula. Penn State Extension notes the harvest comes out cleaner than from potting soil. | A thin mat holds far less water than a layer of mix, so check it every day. |
Do not use garden soil or compost. The University of Saskatchewan warns that garden soil brings in mould, so start every tray with fresh, bagged mix. You also do not need fertilizer: Penn State Extension says little or none is needed, because the seedlings are not grown for very long before harvest.
Growing microgreens without soil on a mat works the same way as the steps above: lay the mat in the tray with holes, soak it, sow on top, cover and keep it dark, then give it light. The roots grow into the fibres. Water from below as before, but more often. Microgreens are still a tray crop in light; seeds grown in water in a jar are sprouts, which are a different crop with a different safety story (see below).
Best Easy Microgreens for Beginners
| Crop | Soak first? | Dark (covered) | Days to harvest | Notes |
|---|---|---|---|---|
| Radish | No | 1–2 days | 8–12 | The fastest and most forgiving; peppery, with pink or purple stems in some varieties |
| Broccoli | No | 2–4 days | 8–12 | Mild cabbage flavour; small seed, so sow evenly |
| Pea shoots | Yes, about 6 hours | 3 days | 8–10 | Uses much more seed; cut when 8–15 cm tall, above the lowest leaves |
| Sunflower | Yes, about 12 hours | 2–3 days | 8–12 | Seed hulls stick to the leaves; mist them and they drop off |
| Arugula | No | 1–2 days | 6–8 | Very fast and peppery; tiny seed, so use less of it |
| Kale | No | 1–2 days | 8–12 | Grows like broccoli, with a stronger, nutty flavour |
| Cress | No | 1–2 days | about 4–7 | The University of Saskatchewan calls it the easiest of all |
Days, soaks and dark periods for radish, broccoli, pea, sunflower, arugula and kale are from Utah State University Extension; cress from the University of Saskatchewan. Both treat them as starting points, and a cool room adds a few days. Other crops that grow well as microgreens include mustard, beets, chard, cilantro and basil; the slower ones take two to four weeks.
Buy seed packed for microgreens. It comes untreated and in the larger amounts a thick sowing uses; a single tray of pea shoots takes about 150 g of seed. West Coast Seeds, in Delta, BC, sells pea, sunflower, radish, broccoli, kale, arugula and mixed microgreen seed.
Affiliate link — we may earn a commission on qualifying purchases, at no extra cost to you.
Light: Window or Grow Light?
Microgreens need light, which is the main way they differ from sprouts. The University of Saskatchewan suggests a south-facing windowsill or a grow light. In a Canadian winter the window is often the weak point: on the shortest day of the year the sun is up for 8h55 in Toronto, 8h11 in Vancouver and 7h27 in Edmonton, and much of that is low, weak and through cloud. Microgreens grown short of light come up pale, thin and leaning toward the glass.
A grow light fixes that. Utah State University Extension runs its lights on a timer for 18 hours a day, followed by 6 hours of dark. Hang the light close to the tray, roughly 15 to 30 cm above the leaves for a typical LED, and raise it if the leaves bleach or curl. One tray fits under a single LED bar or a small panel; a shelf unit with a light on each shelf is what most people use once they are hooked. Our grow light setup guide covers timers and heights, and our guide to grow lights for indoor plants compares the lights themselves.
Commonly used over microgreen trays: a full-spectrum LED bar or small panel that covers a 25 × 50 cm tray evenly, plugged into a timer. Check that the light covers the whole tray, not just the middle; microgreens at the edge of a narrow light lean toward it. The same light starts tomato and pepper seedlings in spring.
Affiliate link — GrowersGuide.ca may earn a commission on qualifying purchases, at no extra cost to you. See our affiliate disclosure.
Harvesting and Storing
Utah State University Extension says microgreens are ready as soon as the first true leaves appear, or sooner; the University of Saskatchewan harvests once they have their first true leaves and stand at least 2.5 cm tall. Both the seed leaves and the true leaves are eaten.
- Cut with clean scissors just above the mix, a handful at a time.
- Cut them dry. Microgreens keep better if they are not wet when they go in the fridge; rinse them just before eating.
- Use them fresh. The University of Saskatchewan notes they keep for several days in the fridge in a closed container.
- Compost the roots and the used mix. Most microgreens do not regrow, so sow a fresh tray; starting one every three to five days keeps a steady supply.
Common Problems
| What you see | Cause and fix |
|---|---|
| Pale, yellow, long and leaning | Not enough light. Move to a brighter spot or lower the grow light. |
| Wilting, dead leaves | The mix dried out. Check daily; a tray this shallow dries quickly near a heat vent. |
| Grey fuzz, or stems turning black and falling over | Mould or damping-off from too much moisture and still air. The University of Saskatchewan advises composting the tray and starting again with fresh soilless mix, and taking the cover off as soon as the seedlings are up. |
| Fine white fuzz on the roots only | Usually root hairs, which are normal on radish and broccoli. They vanish when misted; mould does not. |
| Patchy, uneven tray | Seed sown unevenly or not pressed into the mix. Sow in one even layer and press it down. |
Microgreens vs Sprouts
The two are often sold side by side and grown from the same seed, but they are grown differently and eaten differently.
| Microgreens | Sprouts | |
|---|---|---|
| Grown in | A tray of mix, coir or a grow mat | Water, usually in a jar |
| Light | Needed | Not needed |
| Time | One to three weeks | A few days |
| What you eat | Stems and leaves, cut above the roots | The whole seedling: seed, root and shoot |
Sprouts carry a food-safety risk that Health Canada treats separately. The warm, wet days it takes to sprout a seed are also ideal for bacteria, and the bacteria can be inside the seed itself, where rinsing cannot reach them. If you grow sprouts as well as microgreens, read this first:
Who should not eat raw sprouts. Health Canada names children, older adults, pregnant people and people with weakened immune systems as being at greater risk of food poisoning from sprouts, and tells those groups not to eat them raw: children, the elderly and people with weakened immune systems “should not eat any raw sprouts at all,” and pregnant people are advised to avoid raw sprouts and to eat only thoroughly cooked ones. The risk sits in the seed, not in your kitchen — Health Canada’s own sprouted-seed policy states there is “currently no treatment that can ensure pathogen-free seeds and beans,” because sanitizers cannot reach bacteria sheltered by the seed coat, and the warm, damp days that sprout a seed are also ideal conditions for Salmonella or E. coli O157:H7 to multiply if the seed carries them. Rinsing, clean jars and refrigeration lower that risk; they do not remove it. Source: Health Canada, Food safety tips for sprouts.
Microgreens are grown in light and cut above the mix, so you do not eat the seed or the roots. Use the same care anyway: seed sold for sprouting or microgreens, clean trays, clean scissors, and a fresh tray of mix every time. For sprouts themselves, see sprouting seeds in a jar and growing broccoli sprouts.
Frequently Asked Questions
What are microgreens?
Microgreens are vegetable, herb or grain seedlings cut when they have their first leaves, usually 1 to 3 weeks after sowing. The University of Saskatchewan describes them as young plants harvested as soon as the seed leaves and first true leaves have emerged. They are grown in a tray of mix in light, and cut above the roots.
How do you grow microgreens indoors?
Fill a shallow tray with drainage holes with 2 to 3 cm of moist seed-starting mix or coconut coir, scatter the seed thickly in a single layer, press it in, and cover the tray for a few days to keep it dark and humid. Once the seedlings are up, uncover them and give them a sunny south window or a grow light. Water from below and cut them with scissors when the first true leaves appear.
What are the easiest microgreens to grow?
Radish and broccoli are the usual first crops: the seed is small, needs no soaking, and is ready in about 8 to 12 days. Pea shoots are just as easy but use more seed and need a soak of about six hours first. Utah State University Extension gives 8 to 10 days for peas.
Do microgreens need a grow light in Canada?
In winter, most often yes. Microgreens need light to grow, unlike sprouts. A south-facing window can work, but December days in Canada are only about 7 to 9 hours long and often cloudy, and microgreens on a dim window grow pale and leggy. Utah State University Extension runs grow lights on a timer for 18 hours a day.
What is the difference between microgreens and sprouts?
Sprouts are germinated seeds grown in water, usually in a jar in the dark, and eaten whole, seed and root included, after a few days. Microgreens are grown in a mix or mat in light for one to three weeks and cut above the roots. Health Canada warns that raw sprouts carry a risk of Salmonella and E. coli that starts in the seed, and advises children, older adults, pregnant people and people with weakened immune systems not to eat them raw.
Can you regrow microgreens after cutting?
Most do not regrow, because cutting removes the growing point. Pea shoots sometimes send up a smaller second cut. Compost the roots and mix and sow a fresh tray; sowing a new tray every few days keeps a steady supply.
What is the best soil for microgreens?
A soilless seed-starting mix (peat or coir with perlite or vermiculite) or plain coconut coir. Penn State Extension says peat-based mixes and coir are the most popular media, and the University of Saskatchewan advises against garden soil, which brings in mould. The crop is cut within two or three weeks, so Penn State notes little or no fertilizer is needed.
Can you grow microgreens without soil?
Yes. Microgreens grow well on a thin grow mat of hemp, cotton, kenaf or rockwool, laid in a tray and kept moist. Penn State Extension notes that microgreens grown on seeding mats come out cleaner than those grown in potting soil. A mat holds less water than a layer of mix, so check it at least once a day.
How long do microgreens take to grow?
Most are ready in one to two weeks. Utah State University Extension gives 6 to 8 days for arugula, 8 to 10 for pea shoots and 8 to 12 for radish, broccoli and kale. Slower crops such as basil and cilantro take two to four weeks. A cool room adds a few days.
What seed should I use for microgreens?
Untreated seed sold for sprouting or for microgreens. The University of Saskatchewan advises using only seed recommended and sold for sprouting, to avoid harmful bacteria, and never seed treated with a fungicide, which is common in garden seed packets and coloured pink, blue or green.
Sources
- University of Saskatchewan, Grow with USask, Microgreens for indoor gardens (PDF)
- Utah State University Extension, Grow your own microgreens
- Penn State Extension, Growing Microgreens and A step-by-step guide for growing microgreens at home
- Health Canada, Food safety tips for sprouts